|


The Staff
 The staff is where everything happens. It consists of five lines and all
the information you need is contained within it (though some notes may be above or below the staff). All the notes (values
explained below) reside either on a line or in a space. The staff is where everything happens. It consists of five lines and all
the information you need is contained within it (though some notes may be above or below the staff). All the notes (values
explained below) reside either on a line or in a space.
The Drum Clef
 The drum clef denotes that the following music is not written for a pitched
instrument; that the position of the note indicates the drum, cymbal, or other percussion instrument played (see the Notation Key). You can tailor your staff for specific instruments - just note them on a notation key. The drum clef denotes that the following music is not written for a pitched
instrument; that the position of the note indicates the drum, cymbal, or other percussion instrument played (see the Notation Key). You can tailor your staff for specific instruments - just note them on a notation key.
There are other clefs which you will run into; these are for playing pitched
instruments. We will not deal with them here.
Time Signature
 This is one of the most important parts of the staff for a drummer. This
tells you how the following notes are to be played. The top number indicates the number of beats in a measure. The bottom
note indicates the note that is to get one beat. This is one of the most important parts of the staff for a drummer. This
tells you how the following notes are to be played. The top number indicates the number of beats in a measure. The bottom
note indicates the note that is to get one beat.
 This may sound complicated, but it's not. In our example the top four indicates
there are four beats in a measure: counting "1, 2, 3, 4". Four beats. The bottom number indicates which note value is getting
the "one". In our example, the quarter note (hence the "4") is getting the value, so in a measure of "4/4" four quarter notes
would be counted "1, 2, 3, 4" This is also called Common Time, which is sometime indicated by a large "C" in place of the
"4/4" (see Cut Time below). This may sound complicated, but it's not. In our example the top four indicates
there are four beats in a measure: counting "1, 2, 3, 4". Four beats. The bottom number indicates which note value is getting
the "one". In our example, the quarter note (hence the "4") is getting the value, so in a measure of "4/4" four quarter notes
would be counted "1, 2, 3, 4" This is also called Common Time, which is sometime indicated by a large "C" in place of the
"4/4" (see Cut Time below).
This will make more sense as you go along.
Cut Time
 Cut time uses the large "C" discussed above with a vertical line through
it, and halves both values. This basically has the effect of speeding the music up twice as fast. Don't worry about this right
now. Cut time uses the large "C" discussed above with a vertical line through
it, and halves both values. This basically has the effect of speeding the music up twice as fast. Don't worry about this right
now.
Bar & Measure
 Some folks would say the bar is where you play, but they don't read music! The
bar separates the measures: each measure is contained within two bars. Some folks would say the bar is where you play, but they don't read music! The
bar separates the measures: each measure is contained within two bars.
Note
As mentioned above, our notes will sit on various lines of the staff,
indicating which drum we are to play. The type of note will indicate the duration the note will have within our measure. The
table below explains the relative values of the notes.

There are two half notes for every whole note; two quarter
notes for every half note; two eighth notes for every quarter note; etc.
If we are dealing with a time signature of "4/4", then the above illustration
would be one measure in length. A whole note would take up four beats: "1, 2, 3, 4"; a half note would
take up two beats: "1, 2, 3, 4,"; a quarter note would take up four beats: 1, 2, 3,
4".
In order to count notes smaller than quarter notes in our "4/4"
example, we need to add some sounds. Four eighth notes, we add "and". Thus, counting 8 eight notes in
our measure will sound like this: "1, and, 2, and, 3, and, 4, and".
Counting sixteenth notes involves adding some more sounds: "e,
and, ah". Thus, counting 16 sixteenth notes in our "4/4" measure will sound like this (take a deep breath):
"1, e, and, ah, 2, e, and, ah, 3, e, and, ah,
4, e, and, ah".
This comes in handy when counting mixed-note measures. I'll get into that
below. Just remember that each notes halves the value of the preceeding note.
Repeats
 I'll explain all the repeats in the above diagram here. The first Repeat
indicates that only one measure is to be played again (this is the measure immediately preceeding the repeat). The number
above this indicates how many times the measure is repeated. It's not uncommon for writers to notate a simple rhythm in one
measure, then put a repeat with a 7 or other number above the repeat, indicating the drummer is to play the measure
seven more times. This is common in show music notation. I'll explain all the repeats in the above diagram here. The first Repeat
indicates that only one measure is to be played again (this is the measure immediately preceeding the repeat). The number
above this indicates how many times the measure is repeated. It's not uncommon for writers to notate a simple rhythm in one
measure, then put a repeat with a 7 or other number above the repeat, indicating the drummer is to play the measure
seven more times. This is common in show music notation.
 The second type of repeat is the Two-Measure Repeat. This works in
the same way as the previous repeat, except two measures are being repeated, not one. As in the regular repeat, the number
over the repeat indicates how many times the 2 measures are to be repeated. The second type of repeat is the Two-Measure Repeat. This works in
the same way as the previous repeat, except two measures are being repeated, not one. As in the regular repeat, the number
over the repeat indicates how many times the 2 measures are to be repeated.
 The most common type of repeat if the Multi-Measure Repeat. This is
indicated by a thick bar at the end of a multi-measure phrase immediately preceeded by two dots (the one on the right of the
two shown). If this is at the end of the staff and no bracketing repeat is shown (the one on the left of the two shown), the
piece is repeated from the beginning. If there is a bracketing repeat, the measures repeated are those within the two repeat
brackets. Unless indicated, thes repeats are taken only once. It is not uncommon to have a repeat within a longer piece of
music - this saves on time writing out repeated notes. The most common type of repeat if the Multi-Measure Repeat. This is
indicated by a thick bar at the end of a multi-measure phrase immediately preceeded by two dots (the one on the right of the
two shown). If this is at the end of the staff and no bracketing repeat is shown (the one on the left of the two shown), the
piece is repeated from the beginning. If there is a bracketing repeat, the measures repeated are those within the two repeat
brackets. Unless indicated, thes repeats are taken only once. It is not uncommon to have a repeat within a longer piece of
music - this saves on time writing out repeated notes.
Exercises commonly have a multi-measure repeat at the end. This
indicates that the exercise can be repeated ad infinitum to build chops.
Tie
 The tie indicates that the two notes tied together are played as one. Thus,
two tied quarter notes would be played like a half note. This is commonly done across bar lines and when linking notes of
different values. The tie indicates that the two notes tied together are played as one. Thus,
two tied quarter notes would be played like a half note. This is commonly done across bar lines and when linking notes of
different values.
Ghost
 The ghost note indicator (parenthesis) indicates that the note is to be played
very quietly, as a ghost. This is common in funk and jazz notation. The ghost note indicator (parenthesis) indicates that the note is to be played
very quietly, as a ghost. This is common in funk and jazz notation.
Accent
 The accent mark indicates that that note is to be played louder than any
of the other notes. This technique allows for rhythmic phrasing using dynamics. Very common in ethnic rhythms. The accent mark indicates that that note is to be played louder than any
of the other notes. This technique allows for rhythmic phrasing using dynamics. Very common in ethnic rhythms.
Dynamics
 Dynamic markings indicate the volume level of a given passage. p stands
for pianissimo, or "softly". f stands for forte, or "loudly". When a letter is preceeded by an m,
this means the note is played "moderately softly," or "moderately loudly", thus giving values between p and f.
p and f can also be doubled and tripled (pp, ppp, ff, fff), meaning "very softly,"
or "very, very softly," depending on the usage. Dynamic markings indicate the volume level of a given passage. p stands
for pianissimo, or "softly". f stands for forte, or "loudly". When a letter is preceeded by an m,
this means the note is played "moderately softly," or "moderately loudly", thus giving values between p and f.
p and f can also be doubled and tripled (pp, ppp, ff, fff), meaning "very softly,"
or "very, very softly," depending on the usage.
Hand
 This is used specifically in drumming notation. When placed over or under
a note, it indicates which hand is to strike that note. You will notice these are used in certain exercises to build independence. This is used specifically in drumming notation. When placed over or under
a note, it indicates which hand is to strike that note. You will notice these are used in certain exercises to build independence.
End
 This solid bar at the end of a staff indicates that this is the end of the
piece of music. If the music continues to another staff below or on another page, there will be a regular, thin bar at the
end of the staff. This solid bar at the end of a staff indicates that this is the end of the
piece of music. If the music continues to another staff below or on another page, there will be a regular, thin bar at the
end of the staff.
Tempo
 You will often run into this over the beginning of a score. This indicates
that the quarter note gets 132 beats per minute. That's really pretty fast, but this is a way for the composer to tell the
performer how fast to perform the music. The note indicated here is usually the bottom note of the time signature, so if we
were in "6/8" time, we would see an eighth note here. You will often run into this over the beginning of a score. This indicates
that the quarter note gets 132 beats per minute. That's really pretty fast, but this is a way for the composer to tell the
performer how fast to perform the music. The note indicated here is usually the bottom note of the time signature, so if we
were in "6/8" time, we would see an eighth note here.
Rests

This diagram shows the rests for the given note value. A rest is just
what it says: don't play. Note that the eighth, sixteenth, and thirty-second rests are alike, one is added to the previous
to indicate its value. As with notes, rests usually rest on the line for the particular voice (drum).
These are the basic notations used on this web site and in most drumming
books. There are other symbols used in other types of musical notation; you might want to get some music books and familiarize
yourself with them.

The following exercises will help you practice what you've just learned
and give you some practical examples. In every case the exercise is followed by a written counting of the measure(s), where
the bold numbers are the played notes, and the regular numbers are not played.
Exercise #1 

Exercise #2

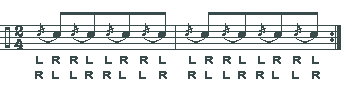
One, two, three, four-and. | One, two, three, four-and.
Note that the eighth notes in both measures are the same. It is a common
practice to draw a line between the tops of the stem of these notes when they are grouped together like this. The next exercise
also shows how this applies to sixteenth notes: there are two lines linking the stem! Thirty-second notes will have
three lines!
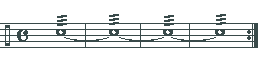
Exercise #3

One, two-and, three-e-and-ah, four. | One, two-and,
three-e-and-ah, four.
Exercise #4

One, two-and, three-e-and-ah, four-and.
Exercise #5

One, two-and, three-e-and-ah, four-and. | One, two, three,
four.
This one is intentionally tricky and introduces a new component: the dotted
note. The dotted note (the third eighth note in the first measure) has a value of one-and-a-half eighth notes. Whenever
a dot is added to a note (and it can be added to any note value), the length of the note grows by half it's value. Since half
an eighth note is a sixteenth note, we can also think of this as three sixteenth notes, rather than one-and-a-half eighth
notes.
Note also that since we always have to come out with an equal amount of
notes per measure, the fourth note in the first measure is a sixteenth note: we used up three of the sixteenth notes in this
beat with the dotted eighth note, so the fourth sixteenth note stands alone.
A tie between the last eighth note in the first measure are the first
quarter note of the second measure. This means the two notes are played as one, as indicated by the text under the staff.
(Note also the half note at the end gets two beats.)
Exercise #6

One, two, three-and. | One, two, -and-ah, three.
Here's a measure in "3/4" so you can see how it's counted. Starting a
measure with a rest can easily throw you off!


You now should have enough under your belt to get you started. it's now
time to go to the music shop and pick up a beginning drum method book. Rubank has three good books: beginning, intermediate,
and advanced. Ask someone who knows how to help you through the rough spots.
Reading music will open up doors to you that you have never even imagined.
It will take some time, and you'll get frustrated along the way. Stick with it! The rewards are great.
|


 OK. These photos didn't turn out as good as I would have liked, but they'll
have to do. In the shot on the left we see a drummer holding the stick like a baseball bat. The only place the hand can get
any movement is in the wrist. This doesn't lend itself to any great speed because:
OK. These photos didn't turn out as good as I would have liked, but they'll
have to do. In the shot on the left we see a drummer holding the stick like a baseball bat. The only place the hand can get
any movement is in the wrist. This doesn't lend itself to any great speed because: The shot on the right shows a drummer holding the stick properly (I'm going
to stick to matched grip here, all you traditional grip folks. Sorry!). Notice the differences: the stick is gripped only
between the thumb and index finger, creating a fulcrum, and the other three fingers are not gripping the stick, but are used
to push the stick forward, then released. The result:
The shot on the right shows a drummer holding the stick properly (I'm going
to stick to matched grip here, all you traditional grip folks. Sorry!). Notice the differences: the stick is gripped only
between the thumb and index finger, creating a fulcrum, and the other three fingers are not gripping the stick, but are used
to push the stick forward, then released. The result: Another benefit to this method is that one can strengthen one's grip - and
thus improve one's speed - by using wrist exercisers (the ones you squeeze). The shot on the left shows the thumb/index finger
fulcrum without the other three fingers in the way. Practice on a pad so that your motions with each hand are identical.
Another benefit to this method is that one can strengthen one's grip - and
thus improve one's speed - by using wrist exercisers (the ones you squeeze). The shot on the left shows the thumb/index finger
fulcrum without the other three fingers in the way. Practice on a pad so that your motions with each hand are identical. The shot on the right shows what I call "tapping": hitting the drum only
on the head. This method works for some styles, but not others. Most jazz, some country, ballade, marching, and show drumming
pretty much requires this technique, and it should be done at the angle indicated here: any higher will run the risk of denting
the head if struck with any force.
The shot on the right shows what I call "tapping": hitting the drum only
on the head. This method works for some styles, but not others. Most jazz, some country, ballade, marching, and show drumming
pretty much requires this technique, and it should be done at the angle indicated here: any higher will run the risk of denting
the head if struck with any force. The shot on the left shows the rim-shot: hitting the drum and the hoop at
the same instant. To do this properly requires some practice, and the angle you set your drums up to is crucial. However,
the advantages to using this technique for harder-hitting styles of music are enormous.
The shot on the left shows the rim-shot: hitting the drum and the hoop at
the same instant. To do this properly requires some practice, and the angle you set your drums up to is crucial. However,
the advantages to using this technique for harder-hitting styles of music are enormous.


